
This is my quest for a playable game and, incidentally, satisfy the requirements of the final project in Makr 140.
For the Prequel-(planning and sketches), see this link: The Prequel-Planning
The Final requires that I answer these three questions:
What was the most challenging part of the process?
I only needed a single die, but I found this the most challenging of the pieces to my project. It was determining the materials and tools that I struggled with most. I have a creative mind, but unfortunately, I am not very good at getting professional looking results. In the several different methods and materials I used to create a die, each looked amateurish. I understand my limitations, so I am willing to accept results that are not “perfect”.
I joined the Maker classes because, with tools, I can produce things that are closer to what I visualize than what I usually get.
What are you most proud to have mastered or learned?
I am proud that I learned the nuances of the laser cutter. I spent a great deal of time simplifying my design and tweaking things in order to get the tokens cut. When my designs did not look as expected, the troubleshooting earned me a lot of knowledge. One major breakthrough was when I discovered that the PDF format Corel/Print drive needed was PDF/A. It’s exhilarating to finally get the design to display and cut properly after so many tries.
If you were to create this again, how might you improve upon your process, planning, or outcome?
Of course, I would have the valuable lessons I learned from the mistakes of my first run. But another student said something to me that I will keep in mind “Keep It Simple”. I know that I made the designs more complex than they needed to be.
For the final product, I think the box laser cut “topper” would have looked better had it been “flush” and not raised.
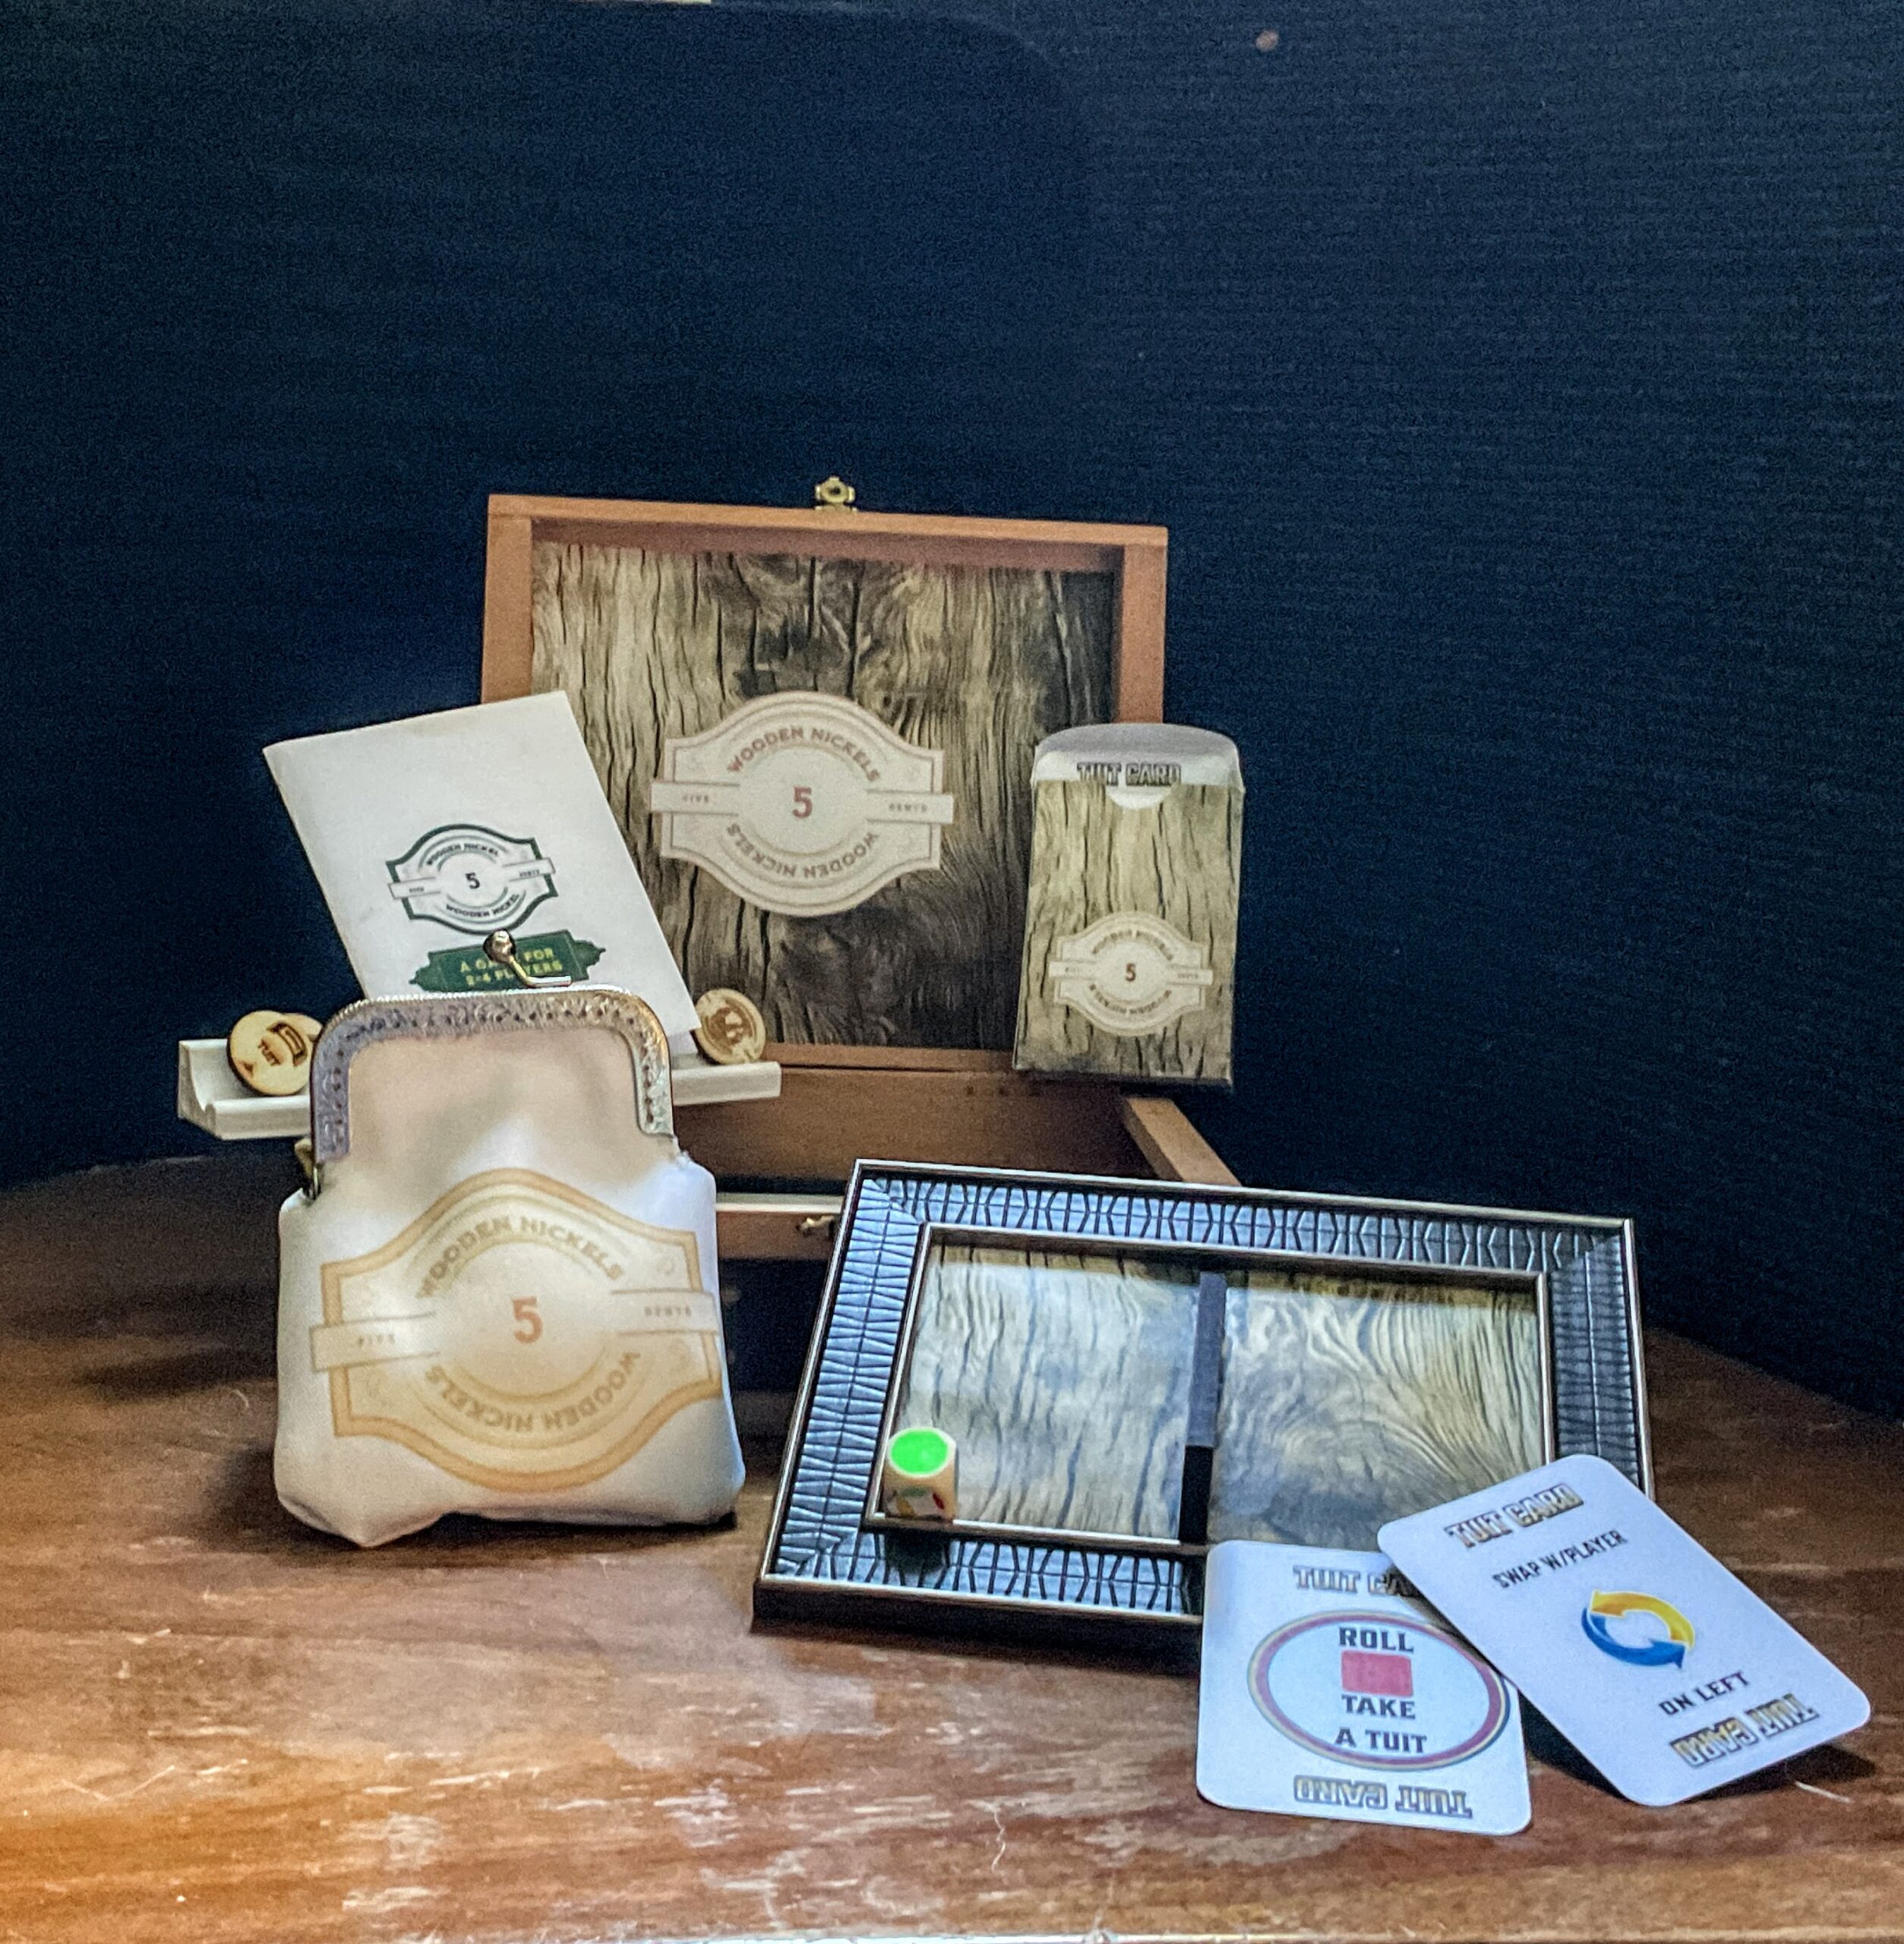
On the tabs below are the 4 major Quests and their associated design, materials, and tools.
Wooden Nickel Game
-
DIE
-
CARDS
-
TOKENS
-
OTHER PARTS
-
Rules of the Game
-
Prequel
Design

Designing was even simpler for this part of the game. I needed a standard 6 sided die, colors on 4 sides and an indicator of “WILD” on two sides. I tried different methods to disguise my lack of precision, such as taking a Sharpie to the edges of an acrylic die to hide the lack of clean lines in the paint.
Materials
I tried several different materials to create the die the way that I wanted it. One die became the winning design, but it was only “good enough”. Materials used were paint, stickers, vinyl, clay.
1. Thermoplastic die
This was interesting to work with. The substance melts in hot water and becomes pliable and can be molded. Unfortunately, I couldn’t get a mold that allowed for a perfect and balanced cube.
2 & 3. Polymer clay die
I looked around my house for something that would help me create a perfect cube. I found nothing so I went ahead and shaped this die by hand and baked it. The first attempt was larger than the other dice and that should have made it easier to paint. It really wasn’t easier. I had more clay and tried again, this time by combining different colored clay. I never found the perfect “cube cutter”.
4. 3D Printed Die
I printed two 3D dice. On the first one I discovered why you don’t try to do a heat transfer vinyl on it. The second one, I just put stickers on it. They are the largest dice I have done, but they are very lightweight. I had some stickers around the house so I decided that “cats are wild”.
5. Blank Acrylic die with acrylic paint and Sharpie
I painted these with some acrylic paints I had around the house. The edges looked rough, so I outlined them with a Sharpie. I taped it off, but it didn’t matter, I could not paint sides cleanly.
I printed the “wild” sides on vinyl paper and cut it out. I sprayed it with gloss or cover it in Modge Podge.
6. Repurposed die from Disney Yahtzee game
I liked these dice because they had a recess in them which would make each side easier to put a color on it cleanly. For my first attempt at creating colors for this die I used color dot labels and cut them with an Exacto knife to fit. Some white seems to be showing. Once again, cats are wild.
I could not make these look “clean”.
7. Blank wooden die
Not terrible. I tried two different sizes and shapes. The winner was a vaiation of this die. Instead of paint, I used heat transfer vinyl cut on the Silhouette.
.
Tools
Paint brushes, Sharpies, Exacto Knife, oven, laser printer, hot water kettle, 3d printer, dice mold
Design
The design was the easy part of the “action” cards. I knew that I wanted a seamless tiled wood design for the back of the cards to fit with the theme of “wooden”. The front, also was pretty simple. I wanted the look to be reminiscent of the game UNO.
That was where the simplicity ended. I was able to make a suitable design for the cards but could not find materials I liked for the project.
Materials
Material Choice 1-Too Thin
I printed far too many dry runs on my black and white, then my color printer. I was ready to try 65 pound cardstock from Michaels. It was pretty thin. I bought some card sleeves from Amazon. These sleeves are meant to protect specialty cards that are in heavy use. They were okay, but not as robust I wanted. I think I would prefer them to be laminated than to have the “slip cover” on them.
Material Choice 2-Too rough
Next attempt was using 110 pound cover cardstock. The print was awful on this. I have a color laser jet and, although the package said it would work with a laser printer, I suspect it would have been much better on an ink jet. I learned that cover stock is not the same as cardstock.
And “Just Right”
My recent attempt is the “just good enough” 95 pound cardstock. I will use this on my project.
Tools
The next challenge is to cut the cards on the Silhouette Cameo 4. I was unable to get the registration marks to be read by my Cameo. When I cut by hand, my cards are not uniform.
I have pens that replace the cutting blade on the Silhouette and have tried them to make the outline on the back of the playing cards. Unfortunately, they are much too thin to have an impact on the design. I bought some pen holders for the Cameo that will allow me to use most standard markers in the machine. I have since decided not to use them on this project.
After sacrificing many pages of paper to the quest for properly cut lines, I finally produced a set of cards that are “good enough”.

Design
Will nothing be easy with this project? The concept was fairly simple, the design caused much grief. I wanted round tokens reading “TUIT” and one Wooden Nickel. Of course, they needed to be wood.
I used a design website called Kittl.com. While it outputs some slick content for other purposes, it doesn’t do well for simple lines which are needed for laser cutting. I brought the files into Inkscape to manipulate the colors and layers. I saved my files as PDF.
Materials
Basswood Sheet for Crafts-12 x 12 x 1/8 Inch- 3mm Thick Plywood
Tools
Inkscape, PDF X-change, Corel Draw, Universal Laser Cutter
I thought that the design was simplified, but I kept discovering new layers when I brought my design into Corel to cut. The files were unusable on the laser cutter.
When I was CERTAIN that I had the colors properly defined and the cut lines fixed, I brought it into Corel and the lines were corrupted and the colors did not come over. I went home and downloaded a trial copy of Corel Draw and experimented with the PDF file.
My PDF creation software allows me to create different versions of PDF. I saved as PDF/A and, BINGO! The file came into Corel perfectly. I saved it as a CDR and brought it to school.
That should have been the end of my tribulations. However, the version of Corel Draw that I downloaded was newer than the one on the machine connected to the laser cutter and it wouldn’t load. The PDF/A file did load, so I was finally able to cut my tokens.
After accidentally mixing my wooden nickel token with the pile of Tuits, I decided to redesign the wooden nickel and create a few spares.

I am satisfied with the tokens. They are “just good enough”.


Wooden Nickel
Pick any player to go first. Play proceeds in a clockwise direction with each person taking the top “Action Card” and following the directions on the card.
Object
The object of the game is to be the first to collect 7 Tuits. You are allowed only 7 tokens in your hand at one time. If you are holding a Wooden Nickel in your hand, you cannot win until you get rid of it through normal gameplay and earn the 7th Tuit.
Action Cards
Take a Tuit – Must roll the appropriate color (or “WILD”) to earn the tuit from the coin purse (bin).
Swap – Swap your ENTIRE rack with the person to your left.
Take a Token- Take one token from ANY player
Put one token back – Give up one tuit and put it back into the bin (cannot be the wooden nickel)
Take the Wooden Nickel – Take the nickel either from the bag or from another player
Gift one token to any player – Can be either a Tuit or Wooden Nickel
Game Play
Player draws the top card and performs action on the card. The used card is placed in the discard pile.
If a player draws a color card and fails to roll the indicated color, they may choose to hold on to that color card. The next time the player draws a color card, they may roll use that color card or use one that they are holding. The used card goes into the discard pile. The player may not hold on to two of the same color cards.